
12. 使用 OpenCV 进行深度学习
本章我们将使用 OpenCV 的深度学习接口,并将其用于目标检测和人脸检测。
本章介绍以下主题:
12.1 技术要求
12.2 深度学习简介
学习提示
如果需要了解,只靠本节的内容不足以了解,所以这里没有这部分笔记,建议有深度学习基础再阅读本章。
12.3 OpenCV 中的深度学习
深度学习模块在 3.1 作为贡献模块引入,并成为 3.3 版本的一部分。但直到 3.4.3+ 和 4.x 版本才被广泛使用。
OpenCV 不支持反向传播,这意味 OpenCV 只能使用训练好的网络进行前向推理。这是因为 OpenCV 没有必要实现别人(PyTorch、TensorFlow 等)擅长的东西,OpenCV 更适合部署,因此应该专注于优化推理的计算速度。
你可以从头开始创建网络,也可以使用现有的网络。有一些网站(例如 TensorEditor(已失效) 和 lobe.ai)能够从可视化的设计器中生成代码来方便我们进行训练。
当我们得到一个令人满意的神经网络,我们就可以把网络的结构和参数导入到 OpenCV 中进行推理啦。
12.4 YOLO 用于实时对象检测
YOLO 是目前最快的对象检测和识别算法之一,NVIDIA Titan X 上可以达到 30 fps(YOLOv3)。
YOLOv7 是更好的选择
当前(2022 年 11 月 11 日)YOLOv7 比以前的版本更快也更加精确,后面也将 YOLOv7 的 OpenCV 部署发布出来。
12.4.1 YOLOv3 深度学习模型架构
YOLO 把整张图像划分成 大小的网络,对于每个网格,YOLO 网络模型预测 个边界框,然后得出边界框包含可能对象的置信度。
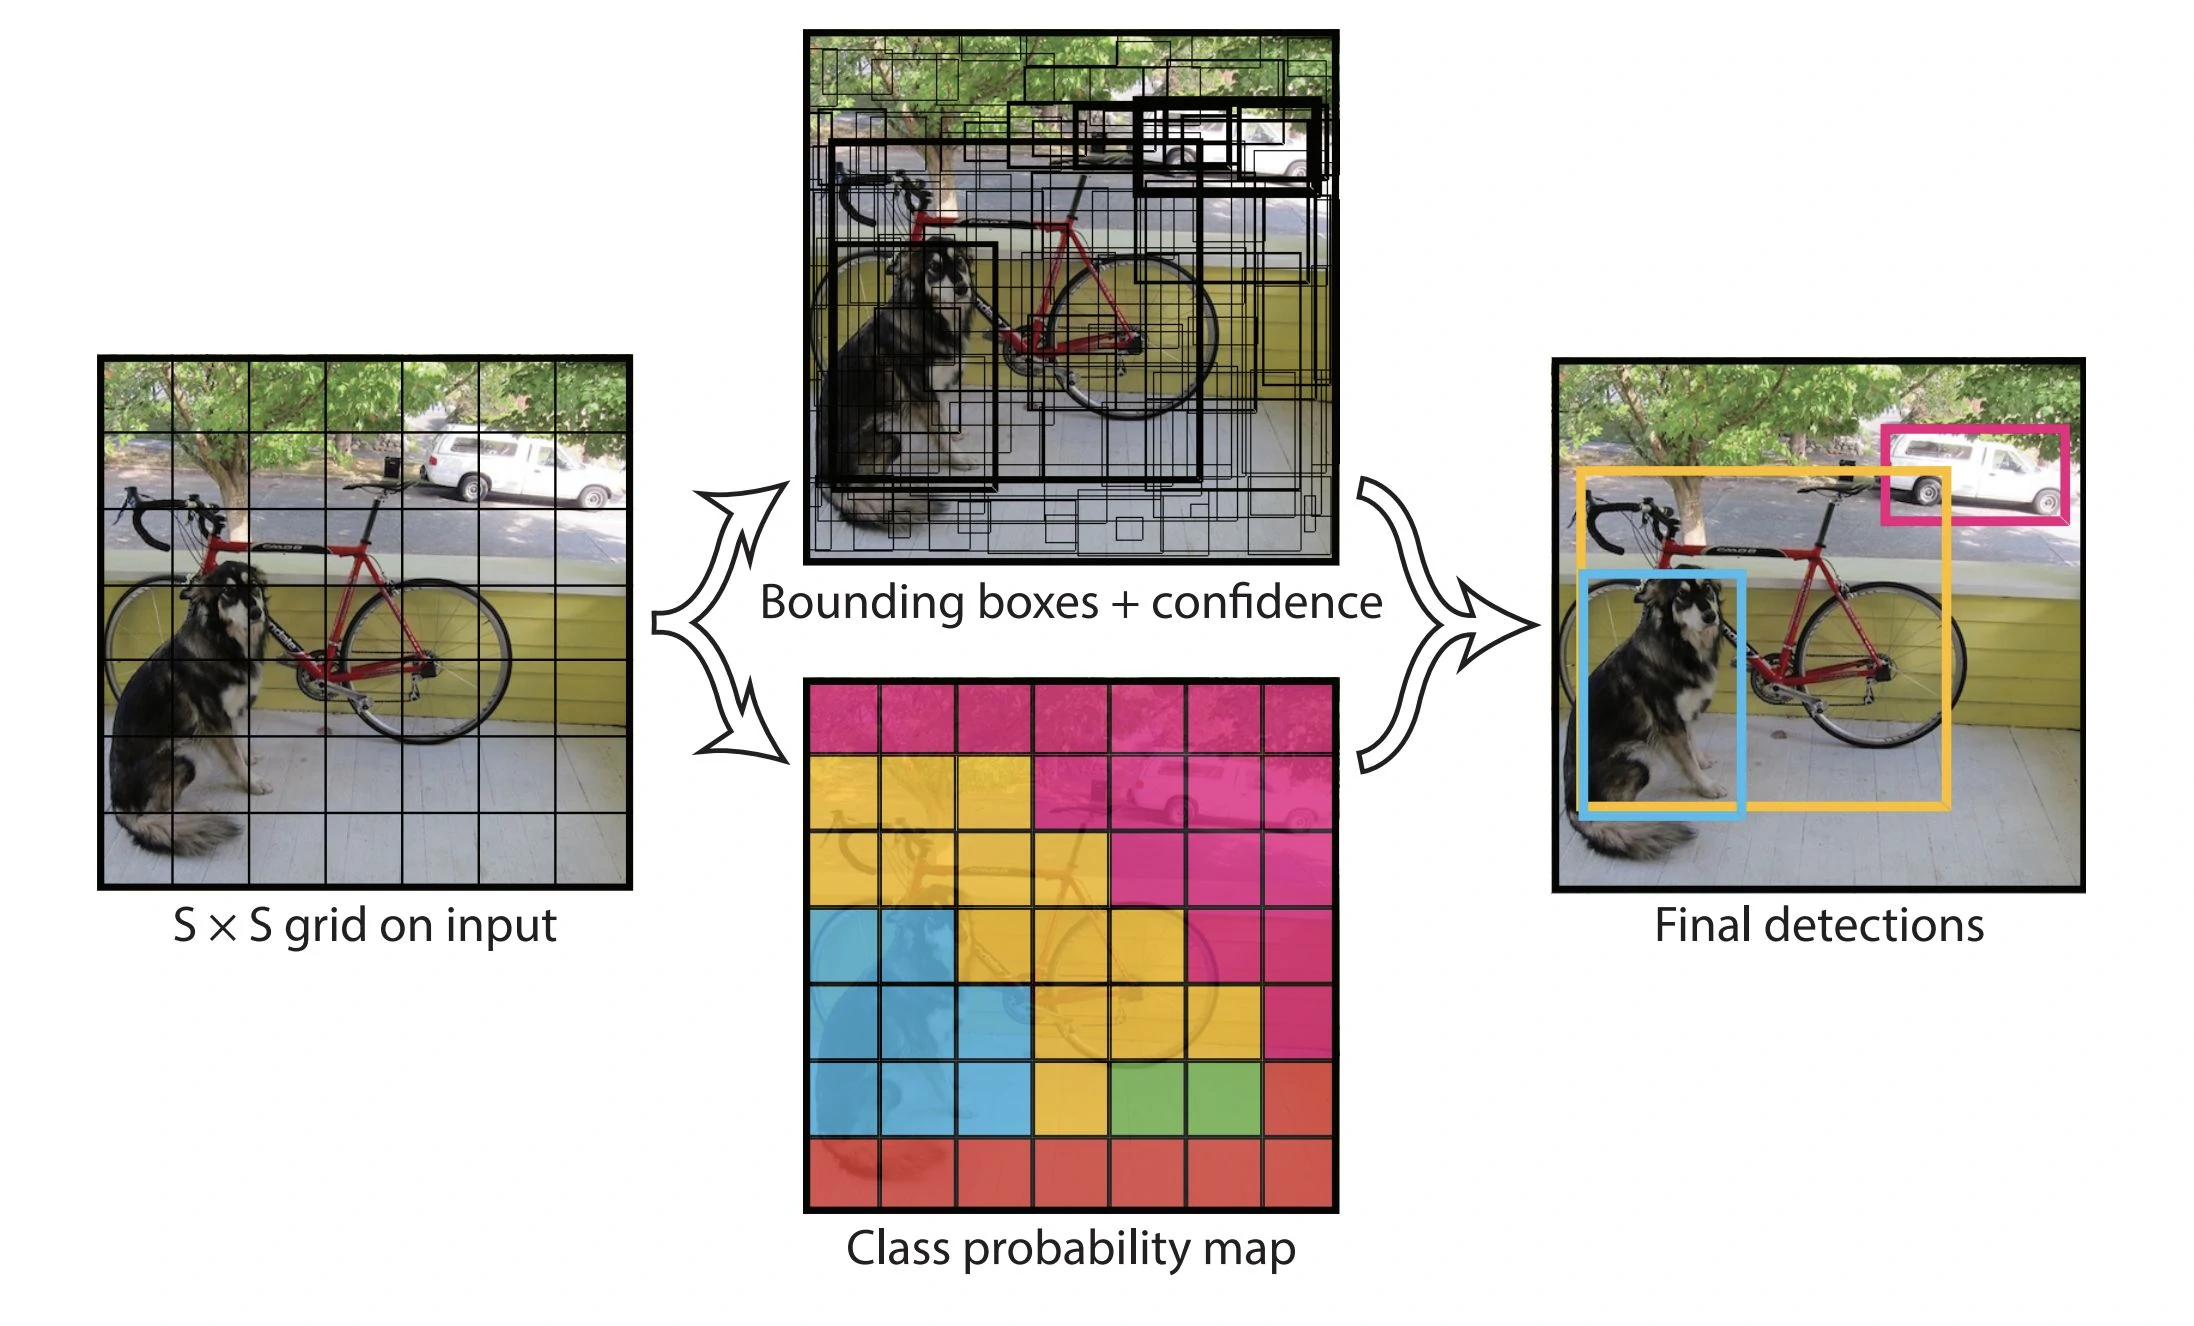
预测框
在上面的例子中,图片被分成了 49 个框,每个框预测 2 个预测框(bounding box),因此上面的图中有 98 个预测框。
可以看到这些预测框中有的边框比较粗,有的比较细,这是置信度不同的表现,置信度高的比较粗,置信度低的比较细。
每个预测框有 5 个量,即中心位置()、宽高()和置信度。
输出结果的总数应该是:
YOLO 默认使用 80 个类别 个网格,5 个分量即预测框的 5 个量,类别数使用 表示,即 ,这里的类别用 One-Hot 编码表示,总数为:
排列方式是:
YOLOv3 架构基于 DarkNet,DarkNet 包含 53 个网络层,YOLOv3 增加了 53 个 层,所以它有 106 层。如果需要更小更快,可以参考 TinyYOLO 或其他迷你版本。
12.4.2 YOLO 数据集、词汇表和模型
YOLO 使用 COCO 数据集,COCO 数据集包含 80 个类别。
下载文件:
- 模型文件:
https://pjreddie.com/media/files/yolov3.weights - 网络文件:
https://github.com/pjreddie/darknet/blob/master/cfg/yolov3.cfg - 词汇表:
https://github.com/pjreddie/darknet/blob/master/data/coco.names
将 yolov3.weights、yolov3.cfg 和 coco.names 放置在本项目的根目录。
12.4.3 将 YOLO 导入 OpenCV
深度学习模块需要使用命名空间 cv::dnn,引入 <opencv2/dnn.hpp>。
OpenCV 的 Mat 图像需要转换为 DNN 张量 / Blob 格式才能输入到神经网络中,可以使用 cv::dnn::blobFromImage() 函数进行转换。
cv::dnn::blobFromImage() 函数的声明如下:
void blobFromImage(
    InputArray image,
    OutputArray blob,
    double scalefactor=1.0,
    const Size& size = Size(),
    const Scalar& mean = Scalar(),
    bool swapRB=false,
    bool crop=false,
    int ddepth=CV_32F
);

Mat blobFromImage(
    InputArray image,
    double scalefactor=1.0,
    const Size& size = Size(),
    const Scalar& mean = Scalar(),
    bool swapRB=false,
    bool crop=false,
    int ddepth=CV_32F
);
其参数如下:
image:输入图像(可能是 1、3 或 4 通道)blob:输出Mat对象scalefactor:图像值乘数size:mean:swapRB:交换颜色通道crop:是否裁剪ddepth:
我们的代码大致如下,其中的后处理和获取输出名称的函数并未进行实现,完整的实现可以参考本章的代码仓库。
#include <fstream>
#include <iostream>
#include <sstream>

#include <opencv2/core.hpp>
#include <opencv2/dnn.hpp>
#include <opencv2/highgui.hpp>
#include <opencv2/imgproc.hpp>

constexpr float CONFIDENCE_THRESHOLD = 0.5;
constexpr float NMS_THRESHOLD = 0.4;
constexpr int INPUT_WIDTH = 416;
constexpr int INPUT_HEIGHT = 416;

std::vector<std::string> classes;

std::vector<std::string> getOutputsNames(const cv::dnn::Net& net) {
}

void postprocess(cv::Mat& frame, const std::vector<cv::Mat>& outs) {
}

int main(int argc, char* argv[]) {
    if (argc < 2) {
        std::cout << "Usage: " << argv[0] << " <image>" << std::endl;
        return -1;
    }
    std::string classesFile = "coco.names";
    std::ifstream ifs(classesFile.c_str());
    std::string line;
    while (std::getline(ifs, line))
        classes.push_back(line);

    std::string modelConfiguration = "yolov3.cfg";
    std::string modelWeights = "yolov3.weights";

    cv::dnn::Net net = cv::dnn::readNetFromDarknet(modelConfiguration, modelWeights);
    net.setPreferableBackend(cv::dnn::DNN_BACKEND_OPENCV);
    net.setPreferableTarget(cv::dnn::DNN_TARGET_CPU);

    cv::Mat input, blob;
    input = cv::imread(argv[1]);
    if (input.empty()) {
        std::cout << "Could not read the image: " << argv[1] << std::endl;
        return -1;
    }

    cv::dnn::blobFromImage(input, blob, 1 / 255.f, cv::Size(INPUT_WIDTH, INPUT_HEIGHT), cv::Scalar(0, 0, 0), true, false);
    net.setInput(blob);

    std::vector<cv::Mat> outs;
    net.forward(outs, getOutputsNames(net));

    postprocess(input, outs);

#ifndef Profile
    std::vector<double> layersTimes;
    double freq = cv::getTickFrequency() / 1000;
    double t = net.getPerfProfile(layersTimes) / freq;
    std::string label = cv::format("Inference time for a frame : %.2f ms", t);
    std::cout << label << std::endl;
#endif

    cv::imshow("object detection", input);
    cv::waitKey();

    return 0;
}
12.5 使用 SSD 进行人脸检测
单摄检测(Single Shot Detection,SSD)是另一种快速、准确的深度学习对象检测方法,它具有和 YOLO 类似的概念,可以在同一架构预测对象和边界框。
12.5.1 SSD 模型架构
12.5.2 将 SSD 人脸检测导入 OpenCV
本文的 SSD 模型使用 Caffe 格式,需要 OpenCV 使用 cv::dnn::readNetFromCaffe() 来创建网络。
#include <iostream>
#include <opencv2/dnn.hpp>
#include <opencv2/highgui.hpp>
#include <opencv2/imgproc.hpp>

using namespace cv;
using namespace std;
using namespace cv::dnn;

const size_t inWidth = 300;
const size_t inHeight = 300;
const double inScaleFactor = 1.0;
const Scalar meanVal(104.0, 177.0, 123.0);

const char* about =
    "This sample uses Single-Shot Detector "
    "(https://arxiv.org/abs/1512.02325) "
    "with ResNet-10 architecture to detect faces on camera/video/image.\n"
    "More information about the training is available here: "
    "<OPENCV_SRC_DIR>/samples/dnn/face_detector/"
    "how_to_train_face_detector.txt\n"
    ".caffemodel model's file is available here: "
    "<OPENCV_SRC_DIR>/samples/dnn/face_detector/"
    "res10_300x300_ssd_iter_140000.caffemodel\n"
    ".prototxt file is available here: "
    "<OPENCV_SRC_DIR>/samples/dnn/face_detector/deploy.prototxt\n";

const char* params =
    "{ help           | false | print usage          }"
    "{ proto          |       | model configuration (deploy.prototxt) }"
    "{ model          |       | model weights "
    "(res10_300x300_ssd_iter_140000.caffemodel) }"
    "{ camera_device  | 0     | camera device number }"
    "{ video          |       | video or image for detection }"
    "{ opencl         | false | enable OpenCL }"
    "{ min_confidence | 0.5   | min confidence       }";

int main(int argc, char** argv) {
    CommandLineParser parser(argc, argv, params);

    if (parser.get<bool>("help")) {
        cout << about << endl;
        parser.printMessage();
        return 0;
    }

    String modelConfiguration = parser.get<string>("proto");
    String modelBinary = parser.get<string>("model");

    //! [Initialize network]
    dnn::Net net = readNetFromCaffe(modelConfiguration, modelBinary);
    //! [Initialize network]

    if (net.empty()) {
        cerr << "Can't load network by using the following files: " << endl;
        cerr << "prototxt:   " << modelConfiguration << endl;
        cerr << "caffemodel: " << modelBinary << endl;
        cerr << "Models are available here:" << endl;
        cerr << "<OPENCV_SRC_DIR>/samples/dnn/face_detector" << endl;
        cerr << "or here:" << endl;
        cerr << "https://github.com/opencv/opencv/tree/master/samples/dnn/"
                "face_detector"
             << endl;
        exit(-1);
    }

    if (parser.get<bool>("opencl")) {
        net.setPreferableTarget(DNN_TARGET_OPENCL);
    }

    VideoCapture cap;
    if (parser.get<String>("video").empty()) {
        int cameraDevice = parser.get<int>("camera_device");
        cap = VideoCapture(cameraDevice);
        if (!cap.isOpened()) {
            cout << "Couldn't find camera: " << cameraDevice << endl;
            return -1;
        }
    } else {
        cap.open(parser.get<String>("video"));
        if (!cap.isOpened()) {
            cout << "Couldn't open image or video: "
                 << parser.get<String>("video") << endl;
            return -1;
        }
    }

    for (;;) {
        Mat frame;
        cap >> frame;  // get a new frame from camera/video or read image

        if (frame.empty()) {
            waitKey();
            break;
        }

        if (frame.channels() == 4) cvtColor(frame, frame, COLOR_BGRA2BGR);

        //! [Prepare blob]
        Mat inputBlob = blobFromImage(frame, inScaleFactor,
                                      Size(inWidth, inHeight), meanVal, false,
                                      false);  // Convert Mat to batch of images
        //! [Prepare blob]

        //! [Set input blob]
        net.setInput(inputBlob, "data");  // set the network input
        //! [Set input blob]

        //! [Make forward pass]
        Mat detection = net.forward("detection_out");  // compute output
        //! [Make forward pass]

        vector<double> layersTimings;
        double freq = getTickFrequency() / 1000;
        double time = net.getPerfProfile(layersTimings) / freq;

        Mat detectionMat(detection.size[2], detection.size[3], CV_32F,
                         detection.ptr<float>());

        ostringstream ss;
        ss << "FPS: " << 1000 / time << " ; time: " << time << " ms";
        putText(frame, ss.str(), Point(20, 20), 0, 0.5, Scalar(0, 0, 255));

        float confidenceThreshold = parser.get<float>("min_confidence");
        for (int i = 0; i < detectionMat.rows; i++) {
            float confidence = detectionMat.at<float>(i, 2);

            if (confidence > confidenceThreshold) {
                int xLeftBottom =
                    static_cast<int>(detectionMat.at<float>(i, 3) * frame.cols);
                int yLeftBottom =
                    static_cast<int>(detectionMat.at<float>(i, 4) * frame.rows);
                int xRightTop =
                    static_cast<int>(detectionMat.at<float>(i, 5) * frame.cols);
                int yRightTop =
                    static_cast<int>(detectionMat.at<float>(i, 6) * frame.rows);

                Rect object((int)xLeftBottom, (int)yLeftBottom,
                            (int)(xRightTop - xLeftBottom),
                            (int)(yRightTop - yLeftBottom));

                rectangle(frame, object, Scalar(0, 255, 0));

                ss.str("");
                ss << confidence;
                String conf(ss.str());
                String label = "Face: " + conf;
                int baseLine = 0;
                Size labelSize =
                    getTextSize(label, FONT_HERSHEY_SIMPLEX, 0.5, 1, &baseLine);
                rectangle(
                    frame,
                    Rect(Point(xLeftBottom, yLeftBottom - labelSize.height),
                         Size(labelSize.width, labelSize.height + baseLine)),
                    Scalar(255, 255, 255), FILLED);
                putText(frame, label, Point(xLeftBottom, yLeftBottom),
                        FONT_HERSHEY_SIMPLEX, 0.5, Scalar(0, 0, 0));
            }
        }

        imshow("detections", frame);
        if (waitKey(1) >= 0) break;
    }

    return 0;
}